What We Do
Our projects – what we do – revolve around interlocking concrete pavers. We are certified specialists who know how to create your uniquely beautiful and durable pavement. Unlike wood decking with its high maintenance and finite lifetime, interlocking concrete pavers should last a minimum of 50 years when installed correctly. Other pavements such as asphalt or poured concrete experience a short life. A well-designed and durable project can result from taking a little extra make to make the right decisions. Find out why concrete pavers are the best choice.
Distinctive Outdoor Concepts can help you make the hard decisions about the best products and solutions for your unique setting and budget. Whether a custom design, inspiration from a photo, or or helping to bring your own design vision to life, we have the expertise and track record to get the job done to make your very happy. We are happy to arrange a no-obligation free in-home (or business) estimate. We suggest you complete our Request Estimate form.
Do you have a unique setting or problem? Do you want something "distinctive"?
We have the capabilities to custom design any size project. We use the most up-to-date software and graphics to help you visualize exactly what your outdoor living space will look like.
Do you have your own crude drawings, magazine photos or perhaps a photo from elsewhere on the Web that inspires you? Your input and creative brief are welcomed and encouraged. And if you are overwhelmed or don't know where to begin, we can help there too. Understanding how you want to use your space, along with your budget, will provide some parameters for our creative juices.
What type of project are you interested in?
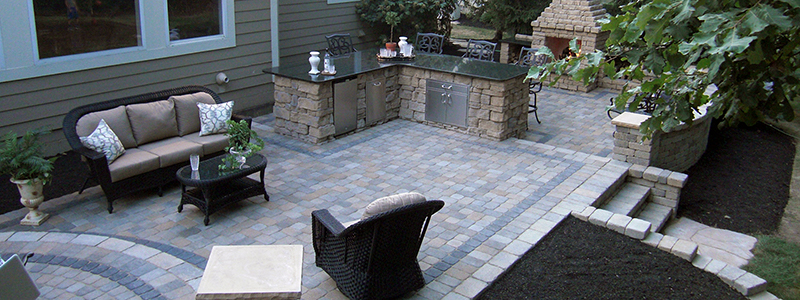
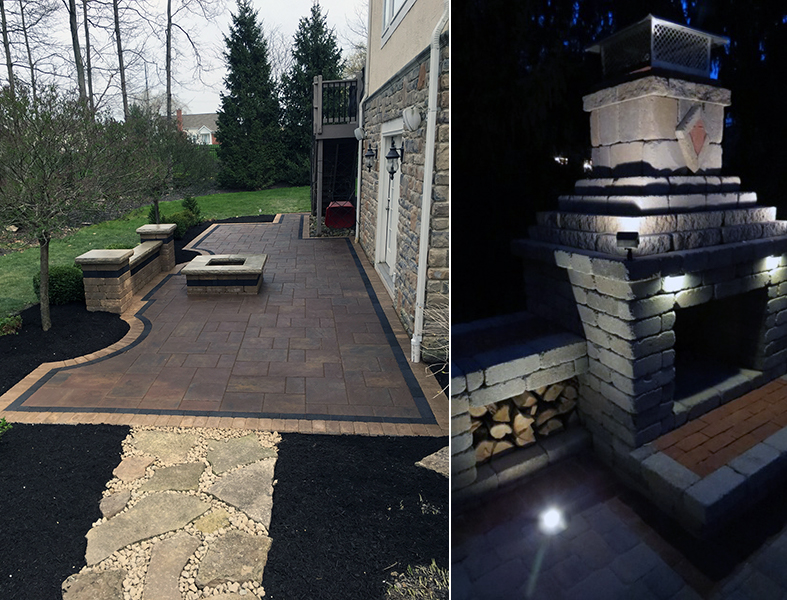
There is no project to large or small for DOC! We take the utmost pride, care and consideration in each and every job. Whether it's a patio, outdoor living area, lighting or landscaping, we will be by your side every step of the way.
- Driveways
- Fire Pits
- Fireplaces
- Large Platform Pavers
- Outdoor Kitchens & Bars
- Patios
- Pavilions
- Pergolas
- Lighting
- Landscaping
- Retaining Walls
- Steps
- Sitting Walls & Pillars
- Walkways
- Water Features
Paver Installation Process
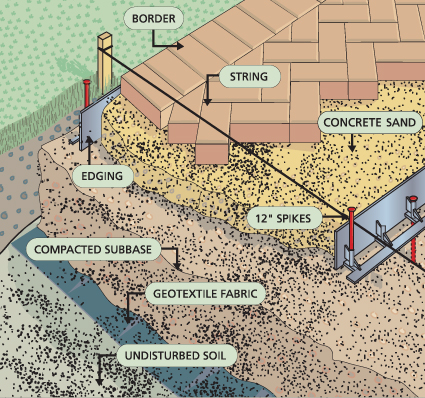
Cross-Section Diagram of Typical Paver Installation
- Design & Pre-Project Preparation
- Distinctive Outdoor Concepts design consultation
- Finalize the design plans and set our target schedule
- Assess the surroundings and decide how we can get necessary equipment and supplies in place for your project with the least risk to drainage tiles or other landscape disturbance.
- Pick the color and type of pavers desired
- Secure permits, if required (not usually), and get utility lines marked
- Excavation / Base
- If project replaces an existing concrete or asphalt, patio or driveway – take out and haul away.
- Walkways or patios – remove a 4″ to 6″ depth of soil below your intended surface.
- Driveways and other heavy-duty applications – excavate soil a 8″ to 10″ depth.
- In moist or wet areas, lay down a geotextile fabric before compacting your base material of 3/4″ stone with fines compacted in 3″ lifts.
- Level to required grade, allowing room for setting bed.
- Setting Bed
- Cover top of the compacted base with 1″ to 1½" of concrete sand.
- Level sand in narrow areas by pulling a 2″ x 4″ board, notched to give the proper depth, across the top of the plastic edging.
- To level wide areas, use a 2″ x 4″ board on top of parallel 1″ diameter pipes.
- Paver Installation
- Place pavers in the desired pattern.
- Select pavers vertically from multiple cubes (how they're delivered on pallets) for optimum color blending.
- Cut odd-shaped pieces within the design to fill in all gaps
- Use string lines to assure a straight layout. (We use a different technique with circular patterns).
- Spacing between pavers should not exceed ⅛".
- Edge Restraint
- Plastic edge restraints are ideal for laying out the borders of the design.
- Lay edging directly on stone base and secure with 12″ landscape spikes.
- We place spikes every two feet for straight walkway and patio edges and every one foot for curves and driveways.
- Compacting / Sweeping
- We spread sand over the top of your paver installation and sweep into all joints.
- The vibrating action of a plate compactor forces sand between the joints to further stabilize and level the surface.
- Excess sand is swept into the joints.